Measuring a fridge or freezer door seal might seem simple, but getting it even slightly wrong can lead to poor insulation, rising energy bills, and spoiled food. This guide walks you through how to measure a fridge door seal correctly, ensuring your replacement fits snugly and seals effectively.
Whether you’re dealing with a cracked gasket or replacing a worn-out push-in seal, we’ll cover the right steps, explain seal types, and answer common questions like “How do I know what size gasket I need?” or “Can I replace fridge door seals myself?”
Can I Buy New Seals for Fridge Doors?
So you’ve noticed your fridge or freezer seal isn’t in great shape, maybe it’s torn, warped, or just not sealing properly. A common question we hear is: “Can I replace the seal, or do I need a whole new appliance?”
The simple answer? Yes! Fridge and freezer door seals can be easily replaced; no need to buy a new fridge.
At The Seal Company, you can order high-quality replacement gaskets by simply providing your measurements and identifying your seal type (either dart or flap fixing). We supply bespoke fridge and freezer seals as well as OEM quality gaskets for hundreds of popular brands.
But before you order, it’s essential to identify the right seal type and measure it accurately to make sure your new gasket fits perfectly.
Let’s get into how to do that.
Step 1: Identify the Seal Type
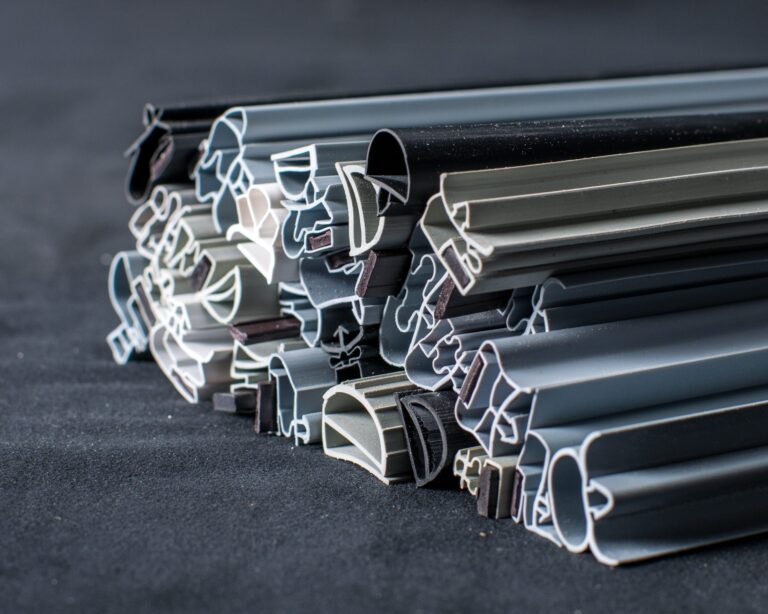
Before taking any measurements, it’s essential to determine the type of seal your fridge or freezer uses. This will determine how you measure it and which replacement profiles are compatible.
There are many gasket styles across brands and models, but most fridge and freezer door seals fall into two main categories:
- Dart fixing – the gasket has an arrowhead (dart) that pushes into a slot or groove in the door.
- Flap fixing – the gasket is usually held in place by a retaining strip, flap, or screws around the door’s edge.

You’ll use slightly different techniques depending on the type, though both can often be measured from the outside edges.
Need help identifying your seal type? Watch this short explainer video
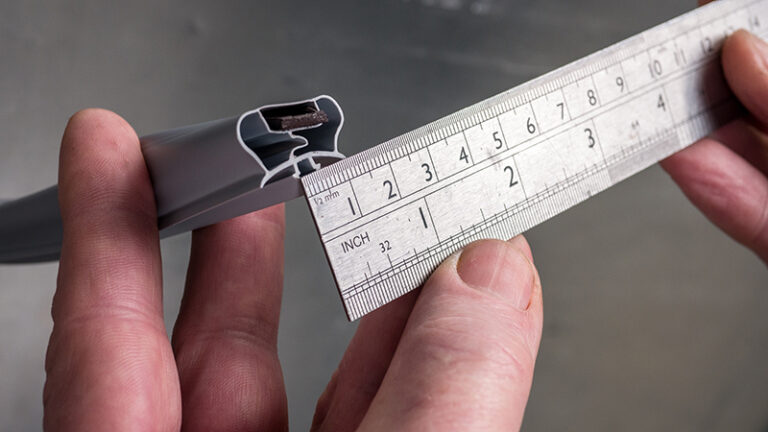
Step 2: Measure from the Outside Edges (Recommended for Most Cases)
For both flap and dart-type gaskets, the easiest and most common method is measuring from the outside edges. Here’s how:
- Lay the seal flat (or leave it fitted if undistorted).
- Hook your tape measure across the outside edge on one side to the outside edge on the opposite side, left to right.
- Repeat the process from top to bottom.
- Record both measurements in millimetres.
- Make a note that you used “outside” measurements.
This method works in most cases and is the fastest way to get started if your current gasket is still intact.
Step 3: Measure from Dart Centres (If the Seal Is Missing or Distorted)
Sometimes, measuring from the outside isn’t possible, especially if:
- The seal is badly warped or perished
- The fridge or freezer doesn’t currently have a seal fitted
- You want an extra-precise measurement for peace of mind
In these cases, use the dart centre method:
- Gently pull back a corner of the seal or remove a small section to access the slot it fits into.
- Hook your tape measure to the inside edge of the slot (dart centre) on one side.
- Stretch the tape to the inside edge of the slot on the opposite side.
- Record both the width and height, in millimetres.
- Note that you measured from “dart centres.”
Watch the full step-by-step for both approaches in this video
Tip: When in doubt, measure both outside edges and dart centres, this gives you a backup, and when ordering from us at The Seal Company, it helps our team confirm compatibility.
Step 4: Record Your Measurements Properly
To avoid confusion or delays when ordering:
- Write down the width × height (in mm)
- State where the measurement was taken: “outside edge” or “dart centres”
- If you’re sending photos, mark the measured area on the image
Example:
- 510 mm × 715 mm – Dart Centres
- 525 mm × 730 mm – Outside Edges
If you’re not sure which profile to choose, you can upload your measurements and photos directly via our site. You can start the process here.
Step 5: What to Do If You’re Still Unsure
If you’re not confident about your measurements or just want to be absolutely sure before ordering, don’t worry, we’re here to help. You can:
- Send us a clear photo of your door or existing seal
- Get in touch with our team by phone or email
Because we manufacture our gaskets in-house, we can match almost any profile and help you avoid ordering the wrong size or type.
As we manufacture our gaskets in-house, we can match almost any profile, helping you avoid ordering the wrong size or type.
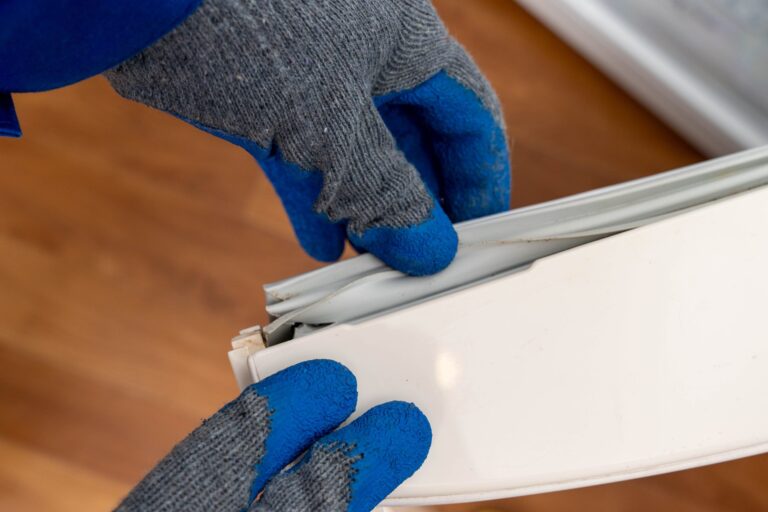
Can You Replace a Fridge Door Seal Yourself?
So you’ve measured and ordered your seal. Now it’s time to fit it. In almost all cases, changing a fridge or freezer door seal is a straightforward DIY job. Most modern seals are designed to be user-friendly, with no specialist tools required. The key is to make sure you’ve got the correct size, type, and fit for your specific appliance model.
1. Flap Fixing Seals
These are typically screwed into place by removing the inner panel of the fridge door. While it’s slightly more involved than push-in types, it’s still very manageable with basic tools.
See our step-by-step guide to replacing a flap fixing seal
2. Dart Fixing Seals
These are push-in gaskets that simply slot into a groove around the door, no screws or glue required. They’re ideal for quick, tool-free replacements.
Watch our video guide on replacing a dart fixing seal
Before you start:
- Make sure you’ve measured your old seal correctly and ordered the right type.
- Clean the door surface to ensure a tight seal.
- Allow the new gasket to rest at room temperature so it’s flexible and easier to install.
Replacing your fridge seal yourself can help restore energy efficiency, improve cooling, and extend the life of your appliance, all in under an hour.
Final Thoughts
Measuring your fridge or freezer door seal correctly is a small task that can make a big difference. An accurate measurement ensures a tight seal, helping your appliance run efficiently, maintaining the right temperature, keeping food fresher, preventing ice buildup, and cutting down on energy waste.
Whether you’re dealing with a torn gasket, upgrading worn-out seals, or just unsure where to start, following the simple steps in this guide and taking your time will help you avoid common pitfalls. Measuring from the outside edges works in most situations, while dart centre measurements are perfect when precision really matters.
And remember, we’re here to help. If you’re uncertain about the seal type, profile, or measurement, simply send us your measurements and a few clear photos, or get in touch. Our team is here to help you get it right the first time.
Common Questions About Measuring and Replacing Fridge Door Seals
How do I check if my fridge door seal is working?
There are a few simple ways to determine if you need a new fridge or freezer seal:
- Paper test: Close the door on a sheet of paper. If it slides out easily without resistance, the seal may not be tight enough.
- Visual check: Look for gaps, cracks, or areas where the seal doesn’t sit flush against the fridge.
- Frost or condensation: Moisture build-up or frost near the seal area often means warm air is leaking in.
- Cold air leak: Run your hand along the edge of the closed door. If you can feel cold air escaping, the seal may be worn or misshapen.
If your seal fails any of these checks, it’s likely time to replace it.
How often should I replace fridge or freezer seals?
It depends on usage:
- Commercial fridges: Replace every 12 months or as soon as wear is visible. Heavy daily use wears seals out faster.
- Domestic fridges: Seals usually last 3–5 years. Replace sooner if you notice cracks, leaks, or stiffness.
Regular checks help prevent energy loss and food spoilage.
Why does my fridge door keep popping open?
A weak or damaged seal can prevent the door from closing tightly. Misalignment or worn hinges could also be to blame.